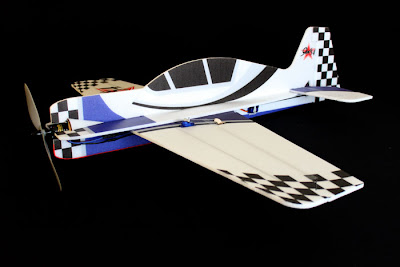
Modified the Yak-54 Foam Model RC Plane

After the bad crash which has caused nose to break apart from the fuselage, I get to know about a few mistakes/disadvantages in the current design that I did as a beginner. Those are:- less distance between propeller tip to ground and weak motor mount to foam. As I'm still lacking of good landing technique, whenever it lands, the prop would hit the ground and results the second problem where motor mount comes out of foam.

Decreasing the prop size might not be a good solution. So, I decided to shift entire nose part up making the model to become a low wing plane and to make stronger motor mount. It's just a 'trial and error' experiment. So, I started doing a motor mount made of wood with 4 short CF tubes (which I had saved some extra pieces when I was making gliders previously).     

Yak-54 35" Depron Foam Model Build Log- Part 4


Continuing the build log of Yak-54 model. As per said in the post before, after a hard landing which has caused the motor mount and landing gear mount to break, I've further modified the model to have less frontal area, strengthened the landing gear attachment with foam, redid the motor mount.

Yak-54 35" Depron Foam Model Build Log- Part 3

Two days ago, I started creating a mount for motor. Glued 2 wooden sticks to wooden motor mount as shown in the next image. These sticks will be glued to the foam which is cut at half-depth. This will make motor mount structure much strong. 


Yak-54 35" Depron Foam Model Build Log- Part 2

Today, I've started working on the airframe where it is mainly built out of compressed white foam and foam with black colouring at one of its sides. We're building it in our hostel (residential college), College 10, UPM.  As per stated in the first part of this build log, I've downloaded the plan/template for this model, printed it out, cut the templates(wings, stabilizers, fuselage) and pasted onto the foam. Since, I've planned to make a different fuselage structure, I did some extra work beyond those plans over that template.

Fuselage has internal width of 2 inches and gets smaller in size as it approaches the stabilizers. Thickness of the foam used is 6mm. So, here is the picture of the non-assembled electronic items, transmitter unit, and Phoenix RC Simulator which I bought from RCSmart. Captured with 2MP Nokia classic phone.


Yak-54 35" Depron Foam Model Build Log- Part 1

The depron foam model of Yak-54 has a wingspan of 35". It is a aerobatic 3D plane and able to hover, hang vertically in flight (due to thrust produced by electric motor mounted on nose), do torque rolls and tail touches. 


You can download pdf plans of this plane from link 1 or link 2. I'm going with the 35" plan in first link. We should use lighter electronic components for this kind of model which you can buy from the nearest RC hobby shops. For us in Malaysia, there are various RC hobby shops in Klang Valley but, I prefer RCSmart which is located in Amcorp Mall, Petaling Jaya because it's the nearest to my university and easiest to reach (Taman Jaya LRT station in front Amcorp Mall). We are using the following electronic components bought from RCSmart.

1) Brushless motorTower Pro 2408-21 black
2) Electronic Speed Control - Emax 20A ESC for brushless motors
3) 9 gram servos (x4)
4) 11.1V 3S 1300mah 25C Li-Po battery
5) Fly Sky 8-channel Receiver unit
6) FlySky TH9X Transmitter unit

The following image shows basic electronic circuit for remote controlled aircraft.

However, we're going to modify the flat single-foam fuselage shown in the plan into thicker fuselage with compartment inside it for the ease of electronic parts placement. Hoping to build something like shown in the image below. 


Started building remote controlled Yak-54 Foam aircraft

Today, me and 4 friends of mine, undergraduate students of Aerospace Engineering in Universiti Putra Malaysia, have started building a small scaled Yak 54 foam model remote-controlled aircraft. A lot more friends are to join. We've started off with soldering the adapters to the cables of electronic components. I used soldering iron 6 years ago when I was studying Form 3 in SMK Telok Panglima Garang. Started off with some bad soldering, later somehow I managed to get the knowledge of soldering back. The friend of mine, Vijayan who is currently a third-year student, was better than me at soldering and helped me throughout the two hours of work today.

Making of remote controlled aircraft or known as RC aircraft/airplane, is being a hobby among people around the world. From young children to older people are involving themselves in this great hobby. A lot of videos, forums, websites and resources are on the internet to teach us how to do a RC aircraft from scratch by our own.

We're having the same passion too. We're going to do it not only as hobby to fill our free-time, but also we shall use this as a medium to understand the theories of flight that are taught to us and also those published on the books.

The main electronic components used for a basic RC aircraft are :- brushless motor, electronic speed controller (ESC),  Li-Po battery,  receiver module and servos. We're intending to build a classical, single motor with puller configuration, fixed wing aircraft out of compressed foam/ Depron foam.

Tomorrow, I will be posting the images and the specifications of the components and materials that we are using to build it. And I shall be sharing my experiences, project works, aeronautics knowledge and constantly update this blog with the projects' build logs and my future plans. Kindly follow up with me!